
Notice
Recent Posts
Recent Comments
Link
반응형
| 일 | 월 | 화 | 수 | 목 | 금 | 토 |
|---|---|---|---|---|---|---|
| 1 | 2 | 3 | 4 | 5 | 6 | |
| 7 | 8 | 9 | 10 | 11 | 12 | 13 |
| 14 | 15 | 16 | 17 | 18 | 19 | 20 |
| 21 | 22 | 23 | 24 | 25 | 26 | 27 |
| 28 | 29 | 30 | 31 |
Tags
- 안드로이드 로그보기
- 파이티스
- 안드로이드 스튜디오 탭바
- Android 앱 개발
- BottomNavigationView
- 안드로이드 스튜디오 미디어재생
- 안드로이드 스튜디오 앱이름 변경
- 안드로이드 스튜디오 앱이름
- 앱 디버깅
- Toast 메시지 띄우기
- android studio
- 액티비티 라이프 사이클
- 안드로이드 스튜디오 알림메시지
- 안드로이드 스튜디오 Fragment 화면전환
- 안드로이드 스튜디오 애니메이션 효과주기
- 안드로이드스튜디오 사용자 메시지
- Snackbar 메시지 띄우기
- AndroidTips
- 안드로이드 개발
- 안디르오드 스튜디오 Logcat
- 안드로이드 스튜디오 네비게이션바
- 안드로이드 스튜디오 하단바
- AWS
- 라이프사이클관리
- PANDAS
- 안드로이드 스튜디오 생명주기
- 앱네임체인지
- 주사위 게임 앱
- 안드로이드 스튜디오
- Log.i
Archives
- Today
- Total
파이티스
안드로이드 스튜디오 BottomNavigationView 하단탭 만들기 (화면전환) - 2 본문
반응형

지난시간 MainActivity에 Fragment를 5개 만들어서 하단 탭바를 생성해보았다. 자세한 내용을 아래 링크를 참고하자!
안드로이드 스튜디오 BottomNavigationView 하단탭 만들기 - 1
Fragment 란? 하나의 액티비티 안에 여러 화면을 구현하는 것이다. 예를들어 카카오톡에서 하단의 탭을 누르면 해당화면으로 전환되는것을 말한다. 액티비티위에 Fragment가 존재하므로 Activity 전체
pytis.tistory.com
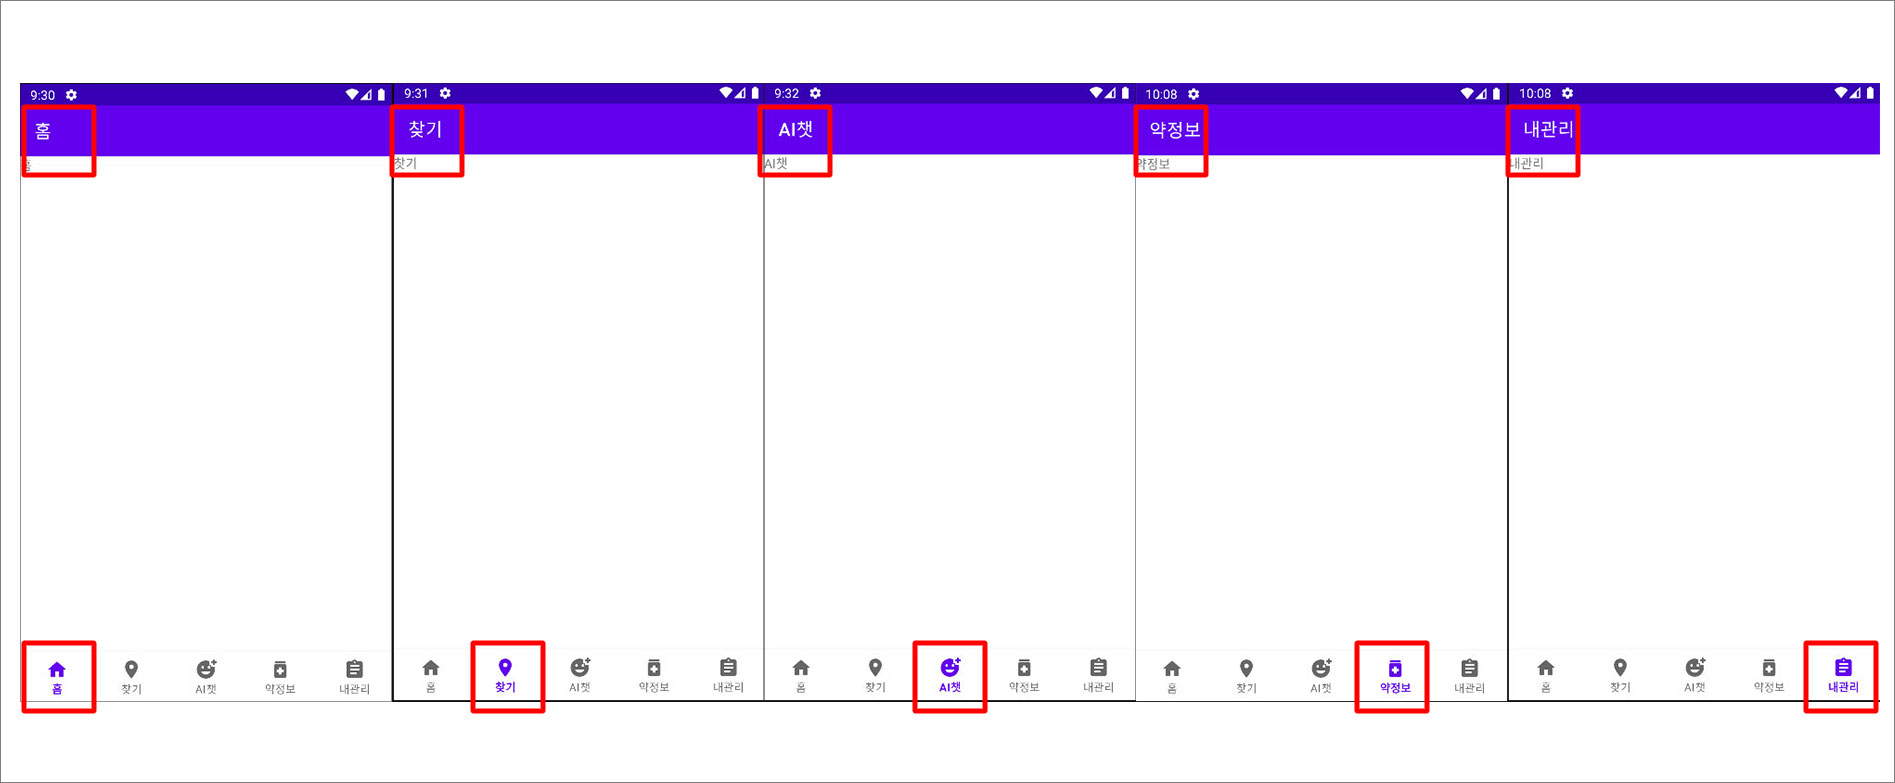
이번시간에는 각각의 아이콘을 눌렀을때 해당 플래그먼트로 화면전환하는 로직 구현을 해보겠다.
멤버변수 만들기
BottomNavigationView 앱 하단에 탐색메뉴를 만들기 위한 뷰를 선언, 5개의 Fragment 멤버변수 만들기
public class MainActivity extends AppCompatActivity {

    BottomNavigationView bottomNavigationView;

    Fragment firstFragment;
    Fragment secondFragment;
    Fragment thirdFragment;
    Fragment fourthFragment;
    Fragment fifthFragment;
onCreate() 메서드가 호출
로직을 구현하고 마지막에 loadFragment() 함수 실행한다.
  @Override
    protected void onCreate(Bundle savedInstanceState) {
        super.onCreate(savedInstanceState);
        setContentView(R.layout.activity_main);

        getSupportActionBar().setTitle("AI챗");

        bottomNavigationView = findViewById(R.id.bottomNavigationView);

        firstFragment = new FirstFragment();
        secondFragment = new SecondFragment();
        thirdFragment = new ThirdFragment();
        fourthFragment = new FourthFragment();
        fifthFragment = new FifthFragment();

        bottomNavigationView.setOnItemSelectedListener(new NavigationBarView.OnItemSelectedListener() {
            @Override
            public boolean onNavigationItemSelected(@NonNull MenuItem item) {

                int itemId = item.getItemId();
                Fragment fragment = null;

                if(itemId == R.id.firstFragment){
                    fragment = firstFragment;
                    getSupportActionBar().setTitle("홈");

                }else if(itemId == R.id.secondFragment){
                    fragment = secondFragment;
                    getSupportActionBar().setTitle("찾기");

                }else if(itemId == R.id.thirdFragment){
                    fragment = thirdFragment;
                    getSupportActionBar().setTitle("AI챗");

                }else if(itemId == R.id.fourthFragment){
                    fragment = fourthFragment;
                    getSupportActionBar().setTitle("약정보");

                }else if(itemId == R.id.fifthFragment) {
                    fragment = fifthFragment;
                    getSupportActionBar().setTitle("내관리");

                }

                return loadFragment(fragment) ;
            }
        });

    }
loadFragment() 함수 정의
이 함수는 프래그먼트를 로드하고 화면에 표시하는 역할
    boolean loadFragment(Fragment fragment){
        if(fragment != null){
            getSupportFragmentManager()
                    .beginTransaction()
                    .replace(R.id.fragment, fragment)
                    .commit();
            return true;
        }else{
            return false;
        }
    }
완성
반응형
'Android > APP 만들기' 카테고리의 다른 글
| 안드로이드 스튜디오 주사위게임 앱 제작 4(완성) - 애니메이션 효과 / 효과음 주기 (0) | 2023.08.18 |
|---|---|
| 안드로이드 스튜디오 BottomNavigationView 하단탭 만들기 - 1 (0) | 2023.08.17 |
| 안드로이드 스튜디오 주사위게임 앱 제작 3 - 로직개발하기 (0) | 2023.08.15 |
| 안드로이드 스튜디오 주사위게임 앱 제작 2 - 화면개발하기 (0) | 2023.08.13 |
| 안드로이드 스튜디오 주사위게임 앱 제작 1 - 초기 세팅하기 (0) | 2023.08.12 |
'Android/APP 만들기' Related Articles
more


